Connect to Starknet
Connect your dapp to Starknet in MetaMask by using the
get-starknet library or the
wallet_invokeSnap JSON-RPC method.
We recommend using the get-starknet library for most use cases due to its ease of configuration
and multi-wallet support.
See a comparison of the connection options.
Prerequisites
- MetaMask installed
- A text editor (for example, VS Code)
- Node version 20.11 or later
- Yarn
- (Optional) A JavaScript or TypeScript React project set up
This connection guide uses get-starknet version 3.3.0 and starknet.js version 6.11.0.
Connect using get-starknet
1. Set up the project
If you don't have an existing React project set up, you can use
Create React App to set up a new React project with TypeScript.
Create a new project named get-starknet-dapp:
- Yarn
- npm
yarn create react-app get-starknet-dapp
npm create react-app get-starknet-dapp
Change into the project directory:
cd get-starknet-dapp
2. Add get-starknet and starknet.js
Add get-starknet version 3.3.0 and starknet.js
version 6.11.0 to your project's dependencies:
- Yarn
- npm
yarn add get-starknet@3.3.0 starknet@6.11.0
npm install get-starknet@3.3.0 starknet@6.11.0
3. Connect to the Snap
Create a src/components directory, and add a new file named WalletConnectButton.js to the directory.
Add the following code to the file, which handles the connection to the Starknet Snap and displays a button
for users to initiate the wallet connection:
import React, { useState } from "react";
import { connect, disconnect } from "get-starknet";
import { encode } from "starknet";
function WalletConnectButton() {
  const [walletAddress, setWalletAddress] = useState("");
  const [walletName, setWalletName] = useState("");
  const [wallet, setWallet] = useState("");
  const handleDisconnect = async () => {
    await disconnect({clearLastWallet: true});
    setWallet("");
    setWalletAddress("");
    setWalletName("")
  }
  const handleConnect = async () => {
    try{
      const getWallet = await connect({ modalMode: "alwaysAsk", modalTheme: "light" });
      await getWallet?.enable({ starknetVersion: "v5" });
      setWallet(getWallet);
      const addr = encode.addHexPrefix(encode.removeHexPrefix(getWallet?.selectedAddress ?? "0x").padStart(64, "0"));
      setWalletAddress(addr);
      setWalletName(getWallet?.name || "")
    }
    catch(e){
      // Handle user rejection to install MetaMask / the Starknet Snap.
      console.log(e)
    }
  };
  return (
    <div>
      {!walletAddress && (
      <button onClick={handleConnect}>
        Connect Wallet
      </button>
      )}
      {walletAddress && (
        <div>
        <button onClick={handleDisconnect}>
            Disconnect Wallet
        </button>
        <div>
          <p>Wallet Name: {walletName}</p>
          <p>Wallet Address: {walletAddress}</p>
        </div>
        </div>
      )}
    </div>
  );
}
export default WalletConnectButton;
This code automatically requests the user to add the Starknet Snap to MetaMask, if it's not already present.
Handle the error if the user rejects the connection request in the try / catch block of the
handleConnect function.
Add a new file named App.js to the src directory, and add the following code to the file to use
the WalletConnectButton component:
import WalletConnectButton from "./components/WalletConnectButton.js"

function App() {
  return (
    <div className="App">
      <header className="App-header">
        <WalletConnectButton />
      </header>
    </div>
  );
}

export default App;
4. Start the dapp
Start the dapp and navigate to it in your browser.
- Yarn
- npm
yarn start
npm start
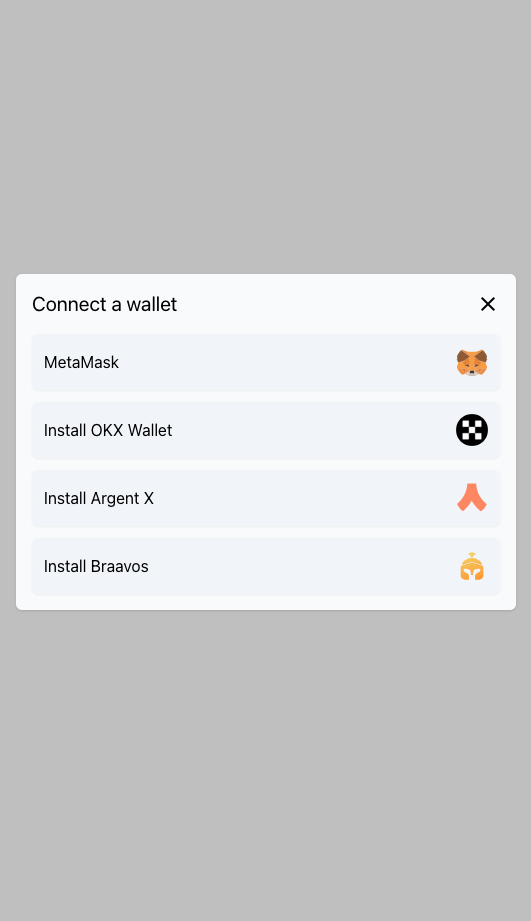
A Connect Wallet button displays.
When a user selects it, get-starknet displays a modal that detects MetaMask and allows users to
choose which Starknet wallet to connect to.
When a user connects to MetaMask, get-starknet requests the user to connect to the Starknet Snap in MetaMask.
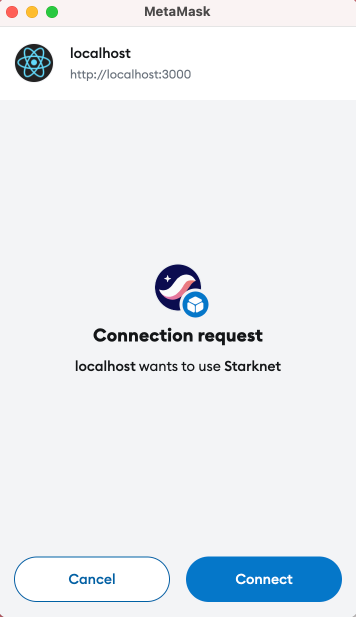
After the user connects to Starknet, the dapp displays the user's connected wallet and wallet address:

Connect using wallet_invokeSnap
Alternatively, you can manage the Snap invocation manually.
Use the wallet_invokeSnap JSON-RPC
method to directly interact with the Starknet Snap.
We recommend using EIP-6963 for detecting the MetaMask wallet when using the wallet_invokeSnap approach. This ensures better interoperability and improved wallet integration.
The Starknet Snap companion dapp serves as a reference implementation and example dapp. It demonstrates how to manually invoke the snap using wallet_invokeSnap, and presents potential use cases and UI integration. For more details, see the source code of the companion dapp's UI.
1. Connect to the Snap
Create a src/utils directory, and add a new file named snapHelper.js to the directory.
In snapHelper.js, add a connect function and a callSnap helper function as follows.
This file handles the interactions with the Starknet Snap:
const snapId = "npm:starknet-snap";

export async function connect() {
  await ethereum.request({
    method: "wallet_requestSnaps",
    params: {
      [snapId]: {},
    },
  });
}

export async function callSnap(method, params) {
  try {
    const response = await ethereum.request({
      method: "wallet_invokeSnap",
      params: {
        snapId,
        request: {
          method,
          params,
        },
      },
    });
    console.log(`${method} response:`, response);
    return response;
  } catch (err) {
    console.error(`${method} error:`, err);
    alert(`${method} error: ${err.message || err}`);
    throw err;
  }
}
To connect to Starknet, the dapp user must add the Starknet Snap to MetaMask.
2. Call a specific Snap method
Use the callSnap function to call a specific Snap method.
The following example calls starkNet_createAccount:
const deploy = false; // Set to true to deploy the actual account.
const addressIndex = 0; // Specify which address to derive.
const chainId = "0x534e5f5345504f4c4941"; // Chain ID of the network to use.

const accountInfo = await callSnap("starkNet_createAccount", { addressIndex, deploy, chainId });
Examples
HTML and Vanilla JS
The following is a full example of a simple HTML and Vanilla JavaScript dapp that connects to the
Starknet Snap using wallet_invokeSnap.
It displays a button that, when selected:
- Connects to Starknet in MetaMask.
- Creates a Starknet account.
- Displays the account address.
<html lang="en">
<head>
  <meta charset="UTF-8">
  <meta name="viewport" content="width=device-width, initial-scale=1.0">
  <title>Connect Starknet Snap</title>
</head>
<body>
  <button id="connectButton">Connect Starknet Wallet</button>
  <p id="accountInfo"></p>
  <script>
    async function connect(snapId) {
      await ethereum.request({
        method: "wallet_requestSnaps",
        params: {
          [snapId]: {},
        },
      });
    }
    async function callSnap(snapId, method, params) {
      try {
        const response = await ethereum.request({
          method: "wallet_invokeSnap",
          params: {
            snapId,
            request: {
              method,
              params,
            },
          },
        });
        return response;
      } catch (err) {
        console.error(`${method} problem happened:`, err);
        alert(`${method} problem happened: ${err.message || err}`);
      }
    }
    document.getElementById("connectButton").addEventListener("click", async () => {
      try {
        const snapId = "npm:@consensys/starknet-snap";  // Snap ID
        await connect(snapId);
        const deploy = false; // Whether to deploy the actual account.
        const addressIndex = 0; // The address to derive.
        const chainId = "0x534e5f5345504f4c4941"; // Chain ID of the network to use.
        const account = await callSnap(snapId, "starkNet_createAccount", { addressIndex, deploy, chainId });
        console.log(account)
        document.getElementById("accountInfo").innerText = `Connected Starknet Account: ${account.address}`;
      } catch (error) {
        console.error("Error connecting to Starknet Snap:", error);
      }
    });
  </script>
</body>
</html>
React
The following is a full example of a simple React component that connects to the Starknet Snap using
wallet_invokeSnap.
import React, { useState } from "react";
const ConnectWallet = () => {
  const [accountInfo, setAccountInfo] = useState('');
  const connect = async (snapId) => {
    try {
      await provider.request({           // Or window.ethereum if you don't support EIP-6963.
        method: "wallet_requestSnaps",
        params: {
          [snapId]: {},
        },
      });
    } catch (err) {
      console.error("Snap connection error:", err);
      alert(`Error connecting to Snap: ${err.message || err}`);
    }
  };
  const callSnap = async (snapId, method, params) => {
    try {
      const response = await provider.request({           // Or window.ethereum if you don't support EIP-6963.
        method: "wallet_invokeSnap",
        params: {
          snapId,
          request: {
            method,
            params,
          },
        },
      });
      return response;
    } catch (err) {
      console.error(`${method} problem happened:`, err);
      alert(`${method} problem happened: ${err.message || err}`);
    }
  };
  const handleConnectClick = async () => {
    try {
      const snapId = "npm:@consensys/starknet-snap"; // Snap ID
      await connect(snapId);
      const deploy = false; // Whether to deploy the actual account.
      const addressIndex = 0; // The address to derive.
      const chainId = "0x534e5f5345504f4c4941"; // Chain ID of the network to use.
      const account = await callSnap(snapId, "starkNet_createAccount", { addressIndex, deploy, chainId });
      setAccountInfo(`Connected Starknet Account: ${account.address}`);
    } catch (error) {
      console.error("Error connecting to Starknet Snap:", error);
    }
  };
  return (
    <div>
      <button onClick={handleConnectClick}>Connect Starknet Wallet</button>
      <p>{accountInfo}</p>
    </div>
  );
};
export default ConnectWallet;
See how to troubleshoot connection issues when configuring your dapp using
wallet_invokeSnap.
Next steps
After connecting your dapp to Starknet in MetaMask, you can follow these next steps: